There are many instances where you may want to embed a customized form into a page or post that differs from your general Contact Us Form.
Using Gravity Forms, adding forms has never been easier! Here is a quick tutorial on how to get started.
CREATING A FORM & SETTING UP FIELDS >>
Forms are used to gather and collect information from your readers, potential sponsors, etc. for various reasons. A couple examples would be a Contributor form, Mom of the Year submission form and general Contact form.
STEP 1 >>
Find the FORMS tab in the left column. Here is a list of all the Forms you have created on your site.
STEP 2 >>
To edit an existing Form, simply hover over the Form title and select “Edit”. You will have several forms created for you already: Contact Us, Advertise With Us, Become A Contributor and a Sample Mother Of The Year Form.
STEP 3 >>
To create a new Form, simply go to the “Add New” button either underneath the FORMS tab or at the top of the main Forms page. Then give the Form a Title and Description (Note: Both will display when the Form is inserted into a Page or Post).
STEP 4 >>
Creating a Form is very simple, all you need to do is drag and drop the various FIELDS in the main form content area.
- Standard Fields :: Basic form functionality; For general uses such as Single Line Text, Radio Buttons, Drop Down and Checkboxes

- Advanced Fields :: Advanced formatting on regularly used fields; For specific uses such as Name, Address, and Email

- Post Fields :: Allow you to create Post Drafts based on field submissions; Submissions will be used to build a post on your site

STEP 5 >>
To edit each FORM field, just select the blue dropdown arrow next to the Form Field. There you can set the Field Label, add a Description, make a Field required and set Dropdown choices, etc.
STEP 6 >>
Once you have added all your Fields, select blue “Update Form” button to save any changes.
MODIFYING FORM SETTINGS >>
Now you can adjust the various settings for your Form by going to Form Settings located directly above your Fields.
- Form Settings :: Here you can set Form Basics, Layout, Button, etc. In the bottom Form Options section, be sure to select “Enable anti-spam honeypot” which will help prevent SPAM.

- Confirmations :: Here is a list of the confirmation which will be received by Form entrants. You can easily edit this by hovering over the “Default Confirmation” title and selecting “Edit”. You can either have a message display upon form completion, redirect them to a different page of your site or redirect them to a different website completely.

- Notifications :: Here you can set who will receive notifications upon form submissions. Select “Edit” underneath the Admin Notification and then in the “Send To” section enter the appropriate emails into the “Send to Email” section. By default it will send to your {admin_email} set in your Settings > General section

VIEWING FORM ENTRIES >>
To view form Entries, go to the “Entries” option next to “Form Settings” or by going to the “Entries” option underneath the FORMS tab in the black left hand column.
You can view form Entries in detail by hovering over the Entry and then selecting “View”.
INSERTING THE FORM INTO PAGES OR POSTS >>
STEP 1 >>
Now to insert the Form onto a Page or Post is really simple. Go to the Page or Post you’d like the Form to appear on.
STEP 2 >>
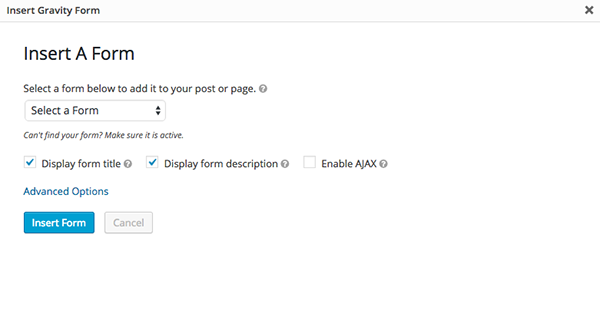
Place your cursor where you’d like the Form to appear and then using the “Add Form” button next to the “Add Media” button select the appropriate Form from the dropdown in the pop-up box that appears.
STEP 3 >>
Select Insert Form and then the following code will be inserted into your content area:
[ gravityform id=”1″ title=”false” description=”false” ]
STEP 4 >>
Then Update your Page or Post and you should be set.
Here are a few examples of Gravity Forms: Contact Us, Partner With Us and Start A Sister Site.


