In this resource, we will discuss how you can set up ads on your site.
Ad Terminology:
Here is a brief rundown of the terminology you will need to know:
- AdGroup:: This refers to the different sizes of ads you will be displaying.
- AdVerts:: This refers to the actual image ads you will be displaying.
AdGroups::
Groups are useful if you use multiple locations or sizes for ads. You will want to create an ad group for each ad size.
Typical Ad Sizes:
These are typical ad sizes that are included in the initial setup of your site. You can set up additional ads in custom sizes as well.
- Leaderboard Ad:: 728 x 90
- Mobile Leaderboard Ad:: 320 x 100
- Half Page Banner Ad:: 300 x 600
- Banner Ad:: 468 x 60
- Medium Rectangle Ad:: 300 x 250
Here’s a link to examples of the ad listed above and how they look on live sites:
Here’s a link to the full Ad Specifications document that shows locations and provides more insight into them. We chose these initial sizes based on Google best practices.
How To Create Your AdGroup::
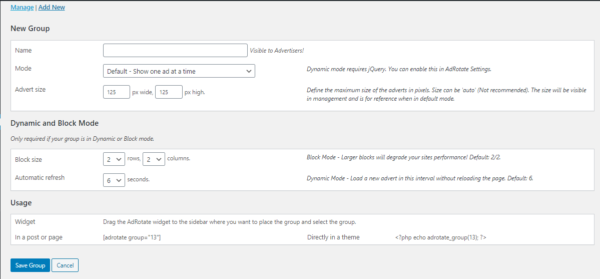
- Go to AdRotate > Manage Groups > Add New.
- Group Name – Set the name for the group. (Ex: Banner Ad – 468 x 60)
- Group Mode – There are one of three modes:
– Default (Only shows one ad at a time and required page refresh to show others)
– Dynamic (Shows one ad at a time for a set amount of time)
– Block (Shows a grid of multiple ads)
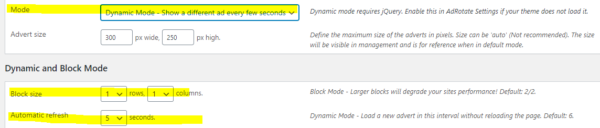
Creating A Block Of Ads::
- In order to create a block of ads, make sure your group is set to “Block Mode”.
- You will then need to set how many columns and rows the block should display.
– Ex: Medium Rectangle Ads are 300×250 pixels, so you can fit 1-column of ads in your sidebar, but unlimited rows (recommended is 2-4 rows).
Creating Rotating Ads::
- In order to create a single location for an ad and have it rotate through multiple adverts, make sure your group is set to “Dynamic Mode”.
- Block Size – You will then need to set how 1 column and 1 row to have a single location.
- Automatic Refresh – The timing the rotate happens.
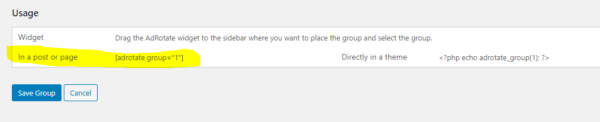
Adding AdGroups To Your Site::
The easiest way to add an AdGroup (a.k.a. Ad Size) to your site is to use the Ads in the Theme Panel.
- Go to your Ad Group
- In the Usage section, copy the ad group shortcode (should look like this the picture below)
- Go to Newspaper > Theme Panel > Ads.
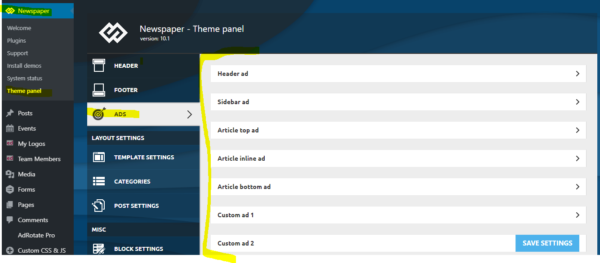
- Review the available options to determine the right location. The options are:
- Header Ad
- Sidebar Ad
- Article Top Ad
- Article Inline Ad
- Article Bottom Ad
- Custom Ads 1 – 5
- Paste the shortcode.
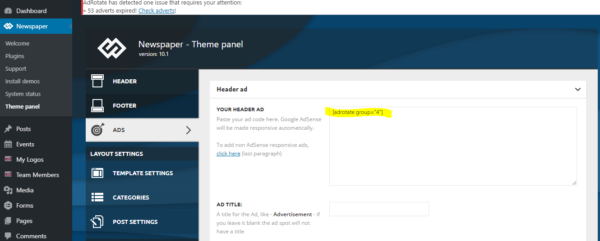
- Save settings.
AdVerts
AdVerts are the actual image ads you display on your site. You will create an AdVert for each image ad that appears on your site.
PLEASE NOTE:: Image ads need to be uploaded at the correct size in order to render correctly and not become scaled or distorted.
How To Create Your AdVerts::
- Create an AdVert by going to AdRotate > Manage Ads > Add New
- On the Edit AdVert screen, add the following:
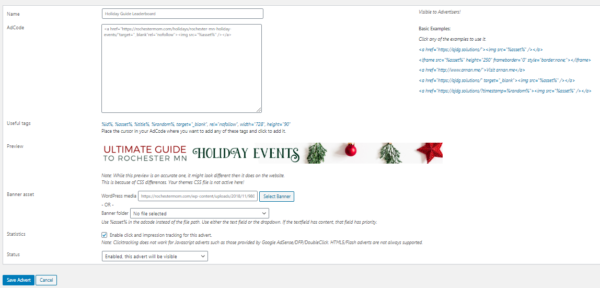
– Name:: Likely be the advertiser’s name and/or campaign name
– AdCode:: This is the actual graphic and hyperlink.
– Copy and paste this code string
<a href="%link%" rel="nofollow" target="_blank"><img src="%asset%" /></a>- replace %link% with the link the ad should lead to for example https://www.google.com
- Banner Asset::
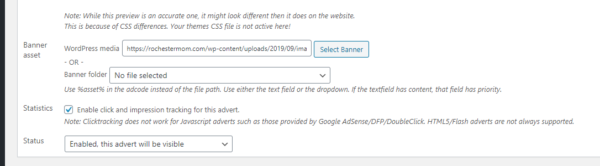
– Banner Asset: Select Banner to upload the ad image or choose from the Banner folder if you’ve already used the ad previously
– Statistics: Check this box to enable tracking.
– Status: Select Enable to have this visible on the site. Disabled the ad will NOT show on the site. - Hit Save Advert.
- Choose Schedules for the Advert or Select an Existing one.
- Hit Save Advert.
- Advanced Options: Choosing Devices/Viewing
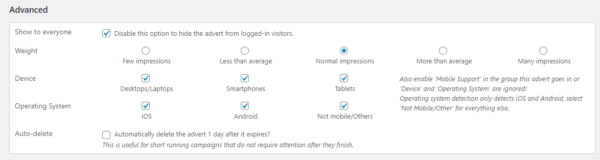
- Show to Everyone: If you want to hide the ads for everyone logged in, check the box next to that option.
- Weight: If you want this ad to show more than other ads (if it’s rotating or dynamic), then you can select that option here. Otherwise, select Normal.
- Device: If you’ve created separate Desktop and Mobile ads, you’ll want to designate that here. If this is a desktop-only ad, uncheck the smartphones option. If this is a mobile-only ad uncheck the desktop option.
- Select Group:: Select the Group the ad belongs to here.
- Hit Save Advert.
Managing Adverts
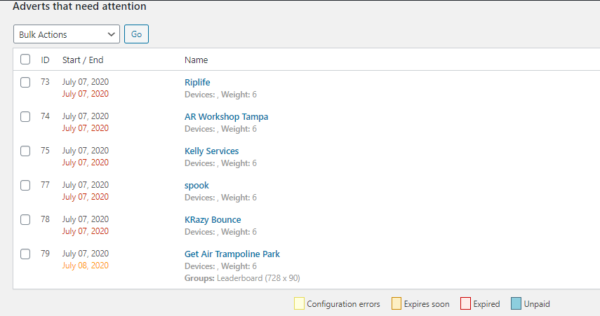
Ads from time to time need your attention. AdRotate has several warning mechanisms to help you keep up. And most of the time tell you exactly what’s going on or needs to be done.
There are 3 sections in Manage Adverts:
- Adverts that need attention
- Active Adverts
- Disabled Adverts
Color-Coded End Dates::
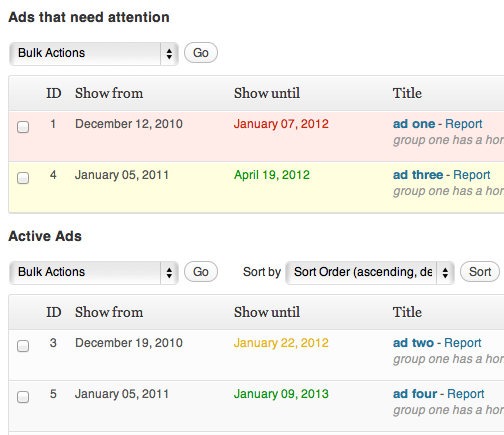 Red – Ad is expired. Immediate action required!
- Orange – Ad is about to expire. You have less than 2 days to sort this out!
- Yellow – This ad has some type of setup error, so look at the advert.
- Green – All seems well!
Dashboard Notifications::
 When issues or expiration dates arise a dashboard notification will show.

How to Add a New Ad Location To Your Homepage
After creating the AdGroup, then you want to set up the ad location on your homepage.
On your homepage, select Edit with TD Composer.
If you’re adding more sidebar ads, then select the Duplicate Element option on one of your existing sidebar ads.
- Hover over the existing sidebar ad.
- Next to the text Element, choose the double boxes to duplicate it.
- Select your new element.
- Over on the left menu, choose Use adspot from:
- Select your ad group from the drop-down.
- Save.
If you want to create an additional ad location somewhere else, then find the location where you’d like to place your ad.
- Select +Add from the top left menu.
- Click and drag the Row option to the location of your new ad.
- Select the new Row on the page.
- On the left menu, select +Add.
- Search for Ad.
- Click and drag the Ad Box option on top of your row.
- Click on Select a Spot ID on your element.
- On the left menu choose Use adspot from:
- Choose your ad group from the drop down.
How to Add A New Ad Location To Your Page
In WordPress, go to Pages.
Find your Page and hover to find the Edit with TD Composer option.
- Select +Add from the top left menu.
- Click and drag the Row option to the location of your new ad.
- Select the new Row on the page.
- On the left menu, select +Add.
- Search for Ad.
- Click and drag the Ad Box option on top of your row.
- Click on Select a Spot ID on your element.
- On the left menu choose Use adspot from:
- Choose your ad group from the drop down.
Video Walkthrough of Setting Up Adverts & AdGroups
Video Walkthrough of Setting Up New Ad Locations