 UTM codes are a type of URL parameters that you can add to the end of a link to track the source, medium, and campaign of traffic to a website. Google Analytics uses UTM codes to help you understand where your website traffic is coming from and what is driving it.
Before you dive into this UTM codes, make sure you’ve read through the first few resources in this series, then scroll below to learn more. There is a lot to know about GA4 but you need to learn it in the right order so it all make sense.
GA4 Resource Series
- #1: GA4 – What You Need to Know
- #2: GA4 Basics + Reporting
- #3: Conversion Tracking with GA4
- #4: How to find AdRotate Stats in GA4
- #5: Using UTM Codes For Tracking <— You are here
- #6: VIDEO: Using Behavior Flow To SetGoals
Here’s a step-by-step guide on how to create a Google UTM code:
Decide on your URL
The first step is to decide on the URL you want to use. This can be any URL that you want to track in Google Analytics. For example, it could be a link to a specific landing page, a blog post, or a product page.
Decide on the UTM parameters to use
There are five different UTM parameters that you can use: source, medium, campaign, term, and content. Here’s a brief overview of each one:
- Source: This is the website or platform where the traffic is coming from. For example, if you’re running a Facebook ad campaign, the source would be “facebook.”
- Medium: This is the type of traffic, such as email, social, or paid search. For example, if you’re sending an email newsletter, the medium would be “email.”
- Campaign: This is the specific campaign or promotion you’re running. For example, if you’re running a Black Friday sale, the campaign would be “black-friday.”
- Term: This is used for paid search campaigns and indicates the keywords you’re targeting. For example, if you’re targeting the keyword “running shoes,” the term would be “running+shoes.”
- Content: This is used to differentiate between different types of ads or links within a campaign. For example, if you’re running multiple Facebook ads within a campaign, you could use different content parameters to track which ad is driving the most traffic.
Build your UTM code
Once you’ve decided on the UTM parameters you want to use, you can build your UTM code using the following format:
?utm_source=SOURCE&utm_medium=MEDIUM&utm_campaign=CAMPAIGN&utm_term=TERM&utm_content=CONTENT
Replace SOURCE, MEDIUM, CAMPAIGN, TERM, and CONTENT with the specific values you want to use. For example, if you’re running a Facebook ad campaign promoting your Black Friday sale, your UTM code might look like this:
?utm_source=facebook&utm_medium=cpc&utm_campaign=black-friday&utm_content=ad1
Add your UTM code to your URL
Finally, add your UTM code to the end of your URL. Make sure to separate your UTM code from your URL with a question mark. Here’s an example of what your final URL might look like:
Use your new URL
You can now use your new URL in your marketing campaigns to track traffic and conversions in Google Analytics. Make sure to use unique UTM codes for each campaign, so you can easily differentiate between them in your reports.
Where to Find UTM Data in GA4?
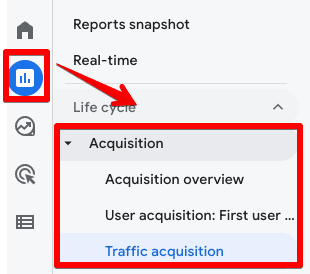
UTM data can be seen in the standard Reports under Acquisition in all three places:
- Acquisition overview
- User acquisition: First user default channel grouping
- Traffic acquisition
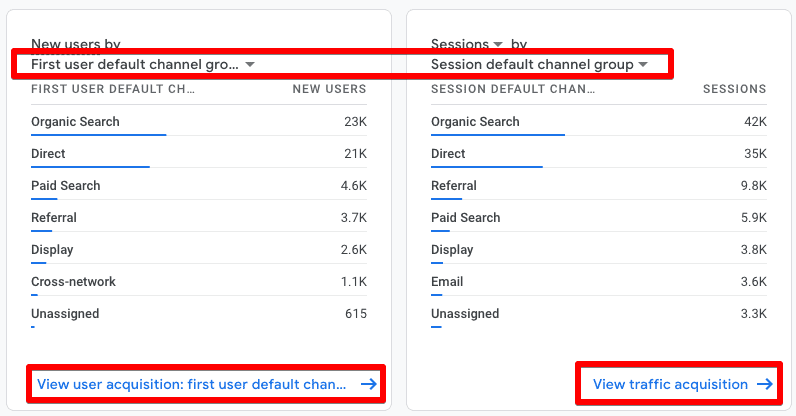
Acquisition Overview
This report is only good to get an accurate overview under the following two cards by clicking on the highlighted drop-down menus.
If you click on the blue text at the bottom right corner, it will take you to the other two main reports we talked about above.
User Acquisition: First user default channel grouping
This report looks at the campaign data for first users only, and you can select what you want to look at by clicking on the drop-down menu as we did above.
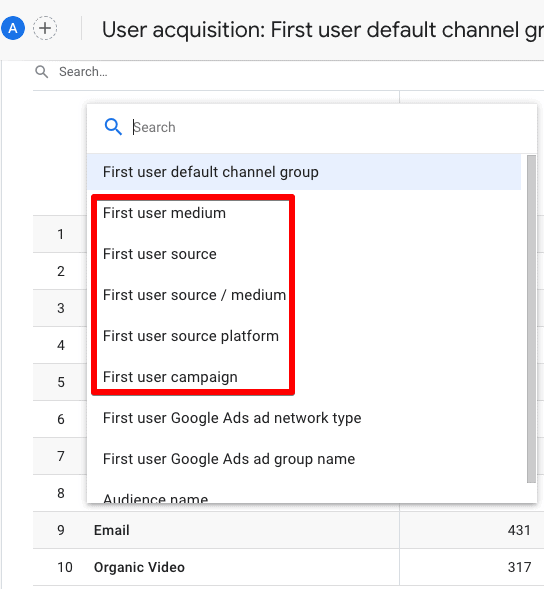
You can also further drill down by adding a secondary dimension if you click on the ‘+’ icon in the same column. For instance, seeing data for the First user campaign as a secondary dimension.
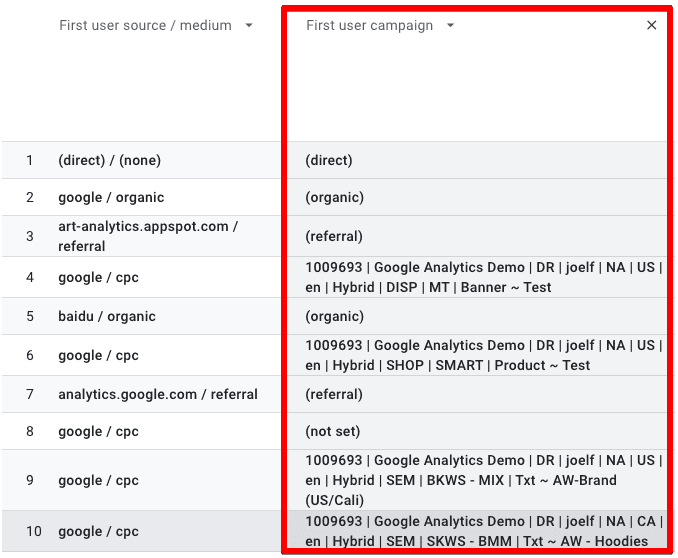
Traffic Acquisition
This report works similarly to the First user report above but is focused on the sessions. You might see some additional options to add in for the secondary dimension, as well.
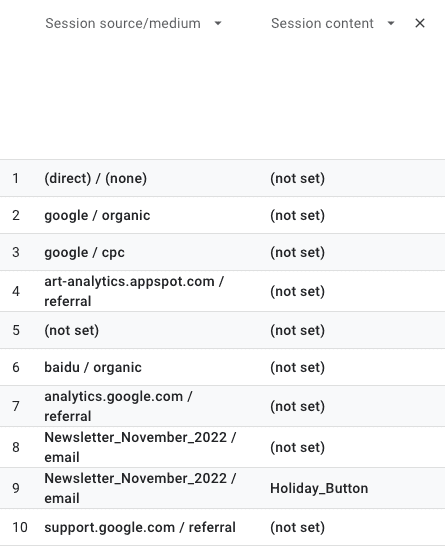
In a similar method, I’ve used Session content as a secondary dimension to see the UTM data which is only available for row 9.
Apart from these standard reports, don’t forget that you can also play around in the Explore section of GA4 to create custom reports with UTM data that might suit your needs.
Best Practices for UTM-Tagging
As you can see in some of the examples above, most of the source/medium had (not set) for Session content and this comes down to how the URLs were tagged.
Following are some best practices to make the most out of our campaign data.
- Naming Conventions – Developing naming conventions will help to standardize your URLs and make it easy for anyone to understand, even if they look at the data a few years later. It also keeps your data clean and organized vs fragmenting it, e.g. Facebook vs facebook.com.
- Keep it Simple – Use easy-to-understand names for your campaigns, content, and keywords. Keeping UTMs close to GA4’s default channel grouping names could also be quite helpful.
- Who created the URL – Adding the name of the person who created the UTM links would make it easy to go back to them in case of any questions, as well as to understand their logic.
- Lowercase vs Uppercase – Decide whether to use lowercase or uppercase to create UTM links. It’s recommended to use lowercase, though.
- URL Shorteners – People can often be scared when clicking on complex or lengthy URLs, and using shorteners will help alleviate this concern.
Following these practices will not only help you get clean data in GA4 but also make it easier for other users to make sense of the data!